Streaming My 3D Printer to Google Home
Yikes! It's my first post in over a year!
During the holidays I was fortunate to be able to take some time off work and was able to tackle a few projects I've had on the back burner for a while. One of those is being able to stream my 3D printer camera to Google Home Hub (I guess it's technically a Google Nest Hub now). For a long time I've had an Octoprint instance with a camera so I can keep track of long prints without sitting right by the printer. That works well, but it's not always the most convenient. We have a Nest Hub in the home which is great for at-a-glance information, and I thought this would be a great way to keep track of my prints.
The process ended up being somewhat convoluted, but it works now. I think there's still room to optimize the process, but I wanted to share what's working so far.
In my mind, the key to this whole process is Home Assistant. I've already been running Home Assistant for some very simple automations around the home, so it gave me a good starting point. I took the easy way for getting Google Assistant integration working and subscribed to Nabu Casa, which has the added benefit of supporting continued development on Home Assistant.
Home Assistant's Google Assistant integration supports cameras, so all I needed to do was get the 3D printer camera into a suitable format.
Adding the Camera to Home Assistant🔗
There are several cameras supported by Home Assistant. Octoprint outputs an
mjpeg stream, which works with Home Assistant's MJPEG IP
Camera. So I was able to
initially get the camera into Home Assistant by looking up the Stream URL in
Octoprint's Webcam settings and add it to to Home Assistant's
configuration.yaml:
camera:
  - platform: mjpeg
    mjpeg_url: http://yateveo/webcam/?action=stream
    name: 3D Printer (mjpeg)
After adding this and restarting Home Assistant, I see a card in Lovelace showing the camera:
 {:width="50%"}
It might seem like all we need to do now is check the box to make sure Home Assistant exports the camera to Google Assistant, but unfortunately we still have a little ways to go.
To make the stream available to Google Assistant, we need to use Home
Assistant's Stream
integration. Enabling this is easy enough. We just need to add a single line to
configuration.yml:
stream:
However, the second sentence in the documentation says that only H.264 streams are supported. This means we'll need to transcode.
Transcoding to H.264🔗
I first started looking at this problem over a year ago. Back then, I decided I would solve this problem by building an in home Kubernetes cluster and run a transcoding service there, along with making my home network resilient to hardware failures and such. That approach was way too complicated. The approach here is probably overly complicated as well, but it has the advantage of working.
It took me quite a bit of trial and error, and I learned something about the numerous video streaming protocols. I wanted a solution without too many moving parts. Ideally I'd have a single executable that reads the mjpeg stream, transcodes it into H.264, and then re-serves it in a format that works with Home Assistant's stream integration. In the end I actually got pretty close. I've already forgotten all the false starts I had, so I'll just explain the working solution I landed at.
At some point I figured out I needed to use a different camera type in Home
Assistant. This is a case where the docs are actually a little unclear. You'd
think the thing you need is the
Camera integration, but
all the documentation there describes things like how to trigger recording from
a stream. What's missing is how to point a camera at a stream in the first
place. It turns out this is handled by the
Generic integration,
which seems to have an overly generic name, but fortunately the search engines
rank this page pretty highly when searching for "home assistant camera." The
live
stream
example shows an rtsp: URL, so I figured I needed to figure out how to make
my camera stream available with RTSP.
I started my search for a lightweight RTSP server but didn't find anything that really stood out to me. Some seemed like they would have been good in the past, but they didn't seem to be maintained anymore. It looks like VLC can do this, but I wasn't able to figure out the magic settings and I didn't realize there was a command line option until now. What I was able to figure out how to set up, however, was an NGINX server using the RTMP module. Astute readers will notice the one letter change between RTSP and RTMP. I thought, "oh, maybe these are just different names for the same protocol." I was wrong; they are actually rather different. We'll get there.
I knew I'd probably use ffmpeg to do the transcoding. I
expected I'd have to set up ffmpeg to run as a daemon process and stream its
output to my RTMP server. It turns out it was easier than that because the
NGINX RTMP module can automatically run ffmpeg for you! Here's the
configuration I used, which is based on the webcam example in the RTMP module
README:
rtmp {
    server {
        listen 1935;
        chunk_size 4000;
        application 3dprinter {
            live on;
            exec_static
                ffmpeg
                    -f mjpeg -i http://yateveo/webcam/?action=stream
                    -c:v libx264 -tune zerolatency -an
                    -f flv rtmp://localhost:1935/3dprinter/stream;
        }
    }
}
In theory this should just work, so to try it out, I connected to my stream in VLC. This was where I first got suspicious that RTMP and RTSP weren't actually the same protocols. When I opened the stream over RTMP, it worked. When I opened it as an RTSP URL, it would just hang and never show me anything. Oh well, at least RTMP worked.
So now I added a generic camera to Home Assistant:
camera:
  - platform: generic
    name: 3D Printer
    still_image_url: http://yateveo/webcam/?action=snapshot
    stream_source: rtmp://yateveo:1935/3dprinter/stream
I checked the Home Assistant UI, and while a camera showed up, it could only
show me a still image taken from still_image_url, but it was not able to show
me any video. It was time to do some more investigation.
One of the challenges I faced in searching for information was that it seems like search engines assume when you search for something like RTSP, you are interested in video streaming in general, and also include results for RTMP, HLS, MPEG-DASH, and a few other acronyms. I think this led to some of my confusion. When I searched for "NGINX RTSP" I got back results for the RTMP module we used earlier. It also felt like many sites didn't explain the differences between these protocols well, or maybe I didn't read closely enough. The latter is quite possible, since I was trying to make something work and not become a video streaming expert.
One post I found extremely helpful was from Dan Jenkins about Casting RTMP Streams Using NGINX. This described something close to my use case. I had a working RTMP stream already, I just needed to make it castable. The solution, it turns out, is to use HLS. (I'm going to do the same thing I just complained about and not explain what HLS is or why you want it, other than to say that it made things work, since I really don't understand this area well at all.)
I was somewhat suspicious that HLS might be important, since basically every
NGINX RTMP configuration I saw included hls on in it. Still, I didn't want to
blindly include that until I knew I needed it. Ultimately, I modified my
configuration to what you see below.
rtmp {
    server {
        listen 1935;
        chunk_size 4000;
        application 3dprinter {
            live on;
            hls on;
            hls_path /tmp/webcam/hls;
            hls_fragment 3s;
            exec_static
                ffmpeg
                    -f mjpeg -i http://yateveo/webcam/?action=stream
                    -c:v libx264 -tune zerolatency -an
                    -f flv rtmp://localhost:1935/3dprinter/stream;
        }
    }
}
The next step was to serve the HLS files over HTTP, by adding the following to my NGINX configuration:
http {
    sendfile off;
    tcp_nopush on;
    aio on;
    directio 512;
    default_type application/octet-stream;

    log_format  main  '$remote_addr - $remote_user [$time_local] "$request" '
                      '$status $body_bytes_sent "$http_referer" '
                      '"$http_user_agent" "$http_x_forwarded_for"';

    access_log  /var/log/nginx/access.log  main;

    server {
        listen 8088;

        location / {
            types {
                application/vnd.apple.mpegurl m3u8;
                video/mp2t ts;
            }
            root /tmp/webcam;
            add_header Cache-Control no-cache;
            add_header Access-Control-Allow-Origin *;
        }
    }
}
Since Octopi runs OctoPrint behind an HAProxy
instance, I decided to expose the stream through HAProxy. I did this by adding
the line use_backend webcam_h264_hls if { path_beg /hls/ } under the
frontend section, and then defining the new webcam_h264_hls backend as
follows:
backend webcam_h264_hls
        server webcam_hls_1 127.0.0.1:8088
        errorfile 503 /etc/haproxy/errors/503-no-webcam-hls.http
Finally, I updated the camera in Home Assistant:
camera:
  - platform: generic
    name: 3D Printer
    still_image_url: http://yateveo/webcam/?action=snapshot
    stream_source: http://yateveo/hls/stream.m3u8
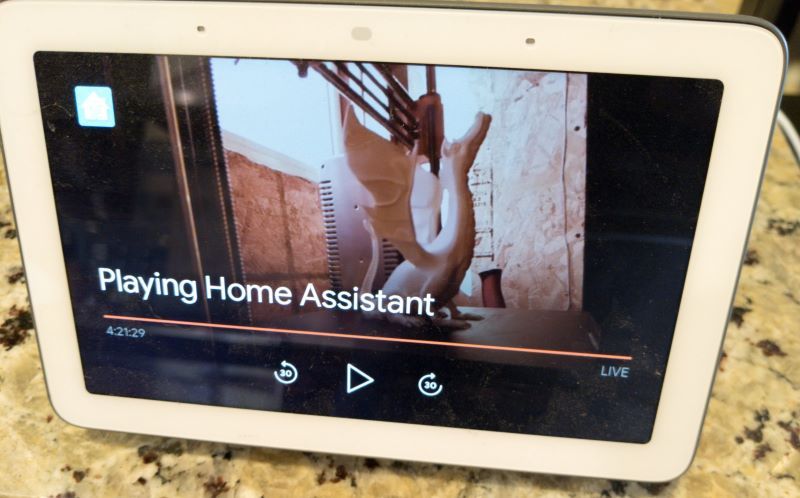
At this point, not only could I see the camera in Home Assistant, but the camera also showed up under devices I could expose to Google Assistant in the Home Assistant Cloud settings. I tried it out and was able to stream the camera to my smart display, as shown below.
It works, but it's not quite perfect. For example, I think this setup is streaming at a faster framerate than the camera captures at, which means the video plays very fast and then starts buffering for awhile. I'll have to continue fiddling with settinsg to figure out what's going on.
Dockerizing my Setup🔗
I didn't mention this until now in order to not distract from the main thrust of this post, but I packaged most of this up as a Docker container. The main reason is that now the transcoding component in my setup is self contained so that, for example, in theory it will be easy to migrate to a more powerful machine if the Raspberry Pi has trouble keeping up. I'm running on a Raspberry Pi 4B, so performance hasn't been a problem so far, but it's nice to keep everything self contained.
My original plan was to use the
nginx:alpine image as a base and then add
RUN apk add nginx-mod-rtmp to my Dockerfile. Unfortunately, the NGINX in the
Docker image is not the same as the one included in the Alpine package
repositories, meaning the plugins are not compatible. I thought about trying to
build the module myself, but I realized it was easier to start from the
alpine base instead and just insteall
everything. In the end, my Dockerfile was pretty short:
FROM alpine

RUN apk add nginx nginx-mod-rtmp ffmpeg
RUN ln -sf /dev/stdout /var/log/nginx/access.log \
    && ln -sf /dev/stderr /var/log/nginx/error.log
RUN mkdir -p /tmp/webcam/hls

COPY nginx.conf /etc/nginx/nginx.conf

CMD /usr/sbin/nginx

EXPOSE 1935 8088
I built the image, tagged it as 3dprinter-stream and then ran the container as follows:
docker run -it -p 1935:1935 -p 8088:8088 --restart unless-stopped 3dprinter-stream
The unless-stopped restart policy causes the container to start up again if
it shuts down for some unexpected reason, like if I reboot the Raspberry Pi.
Conclusion🔗
At the end of all this, I can now watch my prints on my Nest Hub/Google Home Hub/whatever it is. I learned a lot, but mostly what I learned was that the streaming video ecosystem is complex and I don't really understand it. I'm sure they work great if you are building an internet streaming video site streaming thousands of shows to billions of users, but they bring a lot of complexity if you just want to get a stream from one camera to another display. I went with the choices I made here mostly because they were the first ones I found that worked. I suspect there are better ones. I hope this is helpful if you want to try a similar setup, and if you find a way to improve upon it, please let me know!