Automatic Website Deployment With Docker and Google Cloud Build
Lately, I have been experimenting with serving static web sites via Docker images with NGINX. For the simple sites I am playing with, this configuration is probably overkill, but it’s not too hard to set up and it does have some advantages:
- This approach makes it easy to capture all of your configuration information in source control, so it’s easy to spin up a new, identical instance of your site.
- Container hosting is widely available and cheap or even free, meaning you can easily switch providers should the need arise.
- If your site grows beyond a simple static web page, you have more room to grow because you already control your own servers.
- Hosting providers have automated tooling that make building and deploying updates to your site as easy as pushing to a git repository.
I have set up that last bullet point using Google Cloud Build and then hosting my site on a free f1-micro VM. So let’s see how to do it.
Setting up the Docker Image🔗
The first thing you need to do is build a Docker image. I chose to base mine on the official NGINX Alpine image, since NGINX is a solid web server and basing it on the Alpine distribution leads to a much smaller container size.
To get started, import the nginx:alpine image, and copy in your HTML, CSS, JS, etc. files. Your Dockerfile would look something like this, assuming all your site files are in the www directory:
FROM nginx:alpine
COPY www /usr/share/nginx/html
Now we can build and run the container.
docker build -t website
docker run --rm -p 8080:80 website
At this point, if you navigate to http://localhost:8080, you should see your web site!
Building Your Site Too🔗
The previous example works great if all of site files are hand written and there is no automated processing needed. But most sites of any significant size will have some automated build steps, such as JS or CSS minification. Fortunately, we can automate this process as part of our Docker build process, using multi-stage builds. In this case, we actually build two images in our Dockerfile. The first image has everything it needs to build to site, and the second image is like our NGINX image above, except it copies the site files from the previous build stage instead of from your source directory.
Here’s how it works:
# Build the site
FROM node AS build
RUN mkdir /src
COPY . /src
WORKDIR /src
RUN npm install -D && npm run build

# Create the web server
FROM nginx:alpine
COPY --from=build /src/www /usr/share/nginx/html
In this case, my site is built using Gulp (although you can’t see that because it’s all driven by npm). I start with the official node image, then copy the current directory into the /src directory of the image. Then I change into the directory using WORKDIR, and build the site by installing dependencies and running the build script. We assume that the final site files are stored in the www directory.
From there, we make a small change to the web server image. For the COPY line, we add --from=build to indicate that we want to copy from the previous image instead of from your source directory. We also have to adjust the path we are copying from. It’s no longer just www, but /src/www, because that is where the site files were stored in the build image.
At this point, we have a single Dockerfile that describes everything from how to build the site to how to configure the server to run it. If you ever need to move your development to a new computer, getting set up is not as simple as git clone following by docker build. This also means that it’s easy to offload this process to a continuous integration/continuous deployment service.
Building in the Cloud🔗
I decided to do this using Google Cloud Build, but other services such as Travis CI will likely work too. Rather than provide detailed instructions here, I plan to cover the high points. For the rest of the details, there are a number of documents on the Google Cloud web site.
This was basically a two step process:
- Set up the source repository.
- Set up the build trigger.
Setting up the Source Repository🔗
While I could have set this up purely as a Cloud Source Repository, I chose to host my main repo on GitHub with a mirror on Google Cloud. I’m used to using a lot of GitHub features, such as their issue tracker, so this way I can still use those features while integrating with Google.
Setting up the mirrored repository was pretty easy. I went to the Source Repository console, clicked “Add Repository,” and then followed the instructions to “Connect an external repository.”
Setting up the Build Trigger🔗
Setting up the build trigger was also pretty easy. Go to the Cloud Build configuration page, click “Create Trigger,” then connect it to your repository, choose the Dockerfile build configuration option, and then point it at your Dockerfile. I set it up so that the build triggers any time I push the master. For storing the resulting image, I went with a Container Registry hosted on GCP. Make sure to save your image under the latest tag, so that your VM will always load the most recent version.
Serving the Site🔗
For this step, head over to the Google Compute Engine page to set up a new VM instance. I selected the f1-micro image, because this can run continuously each month within Google’s free tier. That said, the sizing recommendations say the machine is underpowered, and I have to reboot it periodically. If I were to scale this up to a production site, I’d probably use a larger instance.
Under the Container section, I clicked the checkbox next to “Deploy a container image to this VM instance.” This opened up the settings below:
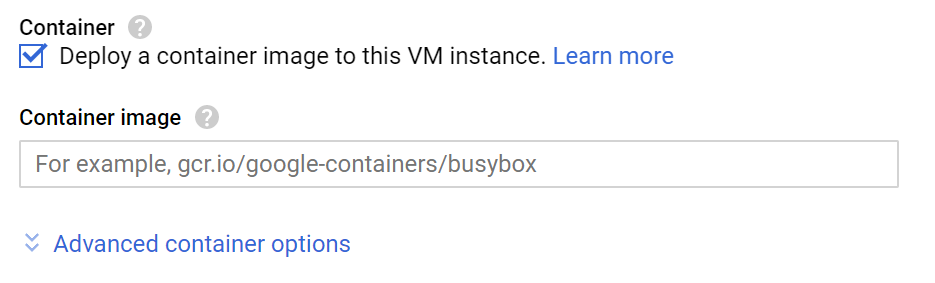
Under “Container image,” I entered the path where my build step stores the completed image.
At this point, you should be basically good to go. Give you machine a static IP address, and point the DNS record for your site at this address. When it’s all said and done, you should be able to navigate to that site.
Updating the Site🔗
Updating the site is mostly, but not quite, automatic. I simply push my changes to the master branch, wait a couple of minutes, and then the new image is ready. From that point, I just have to reset the VM instance so that it will load the new container image.
I’m sure with the right configuration settings, I should be able to automate even resetting the VM instance, but I haven’t felt motivated enough to do this yet.
Conclusion🔗
I’ve given a rough outline of how to host a static web page through a Docker container running on Google Compute Engine. In some ways, this is overly complicated, but it also makes the build, deployment, and configuration process much more self contained and repeatable.
For why this matters, one issue I have is with hosting this blog. I use Octopress deployed to GitHub pages. In 2011, this was a really popular way to do it, but this seems to be rarer now. Unfortunately, due to my infrequent updates, I have to basically re-learn how to publish my site each time. Sometimes, by the time I update my blog, I’ve moved to a different computer and I have to remember how to set up all the dependencies too. I could keep better notes for myself, but packaging the whole build process in a Dockerfile would essentially make my notes obsolete.
Do you have any tips and tricks for running simple static web sites? Let me know in the comments!